


Can You Paint Over Polyurethane – The Best Ultimate Guide 2021
We can meet here because you want to know “Can You Paint Over Polyurethane?” Congratulations. You can get the right answer. Here is the best ultimate guide 2021 for how to paint over polyurethane. Now, let’s begin our journey in this guide.
COVID-19 affects different people in different ways since the 2020 year. Many people do not want to pay additional money for new furniture. They just want to refinish their old furniture to give them new life and a new look. And that can also save a lot of money. Almost every piece of furniture is covered by polyurethane paint. Before you begin the project, you should know can you paint over polyurethane and how to do that.
Can You Paint Over Polyurethane? The answer is yes. This process can easily be applied, but it will take a lot of hard work to get the paint to stick correctly. If you choose to paint over polyurethane without prepping, your paint is likely to peel right off. Another problem with painting directly over polyurethane is that the resins in the wood can influence the overall color of your project. Don’t worry. I have to say again. Here is the best ultimate guide about how to paint over polyurethane.
Before painting over polyurethane, you should prepare some tools and supplies.
- Clean, lint-free cloths
- Mineral spirits
- Wood filler
- Face mask or respirator mask
- Gloves
- Safety goggles
- Fine-grade sandpaper
- Oil-based primer
- Oil-based paint
- Paintbrushes
Precautionary Tips While Painting Over a Polyurethane.
You should always remember the safety is first.
Ensure that you are in a well-ventilated place or a room while preparing for the painting work. These substances contain a lot of chemicals that are harmful following prolonged exposure. Therefore, carry out your projects away from your house where there’s a proper circulation of air. If you are doing this in a room, then open all the windows.
It’s essential to wear protective gear each time you are doing the painting work. Have your goggles on, for example. Also, ensure that you have your pair of gloves on to protect your hand against contact with the chemicals.
The use of a respirator, if you have one, would be great. These chemicals have fumes that you can inhale in the process; they are toxic and can have some adverse health effects on you like dizziness, nausea, and sometimes a headache. Using a protective mask offers protection to your lungs.
Furthermore, working under extreme temperatures poses threats, mainly because most of the materials are highly flammable. Avoid smoking or working around appliances that generate heat.
Avoid working in rainy weather as well. Sunny days make the best working moments; cold days are bad for the curing process as the conditions can end up ruining your entire paintwork by causing cracks.
The most suitable temperature for painting over polyurethane is about 75 degrees Fahrenheit.
How to Paint Over Polyurethane?
Step1: Sand the Furniture Surface.
There are a lot of people that think it is unnecessary to sand your polyurethane before you paint it, mainly because it is a very messy job. However, sanding is extremely important, as this will give you an even surface and allow your paint to stick properly. Sanding is recommended for all surface preparations. Surfaces with varnish, polyurethanes, or other sealants or finishes require sanding before any paint can be properly applied. If not, the newly-painted surface will bubble, peel, crack or generally not stick.
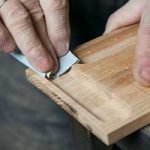
You really should invest some time into sanding a piece of furniture before you paint over the polyurethane finish. Even if you just want to stain the wood a new color instead of painting it, you will need to sand away the thick yellow coat of polyurethane.Keep in mind that it may take several passes with different types of grit. A heavy grit sandpaper should be used first to really rough up the surface and get off as much of the polyurethane as possible. You can use progressively lighter grits to get the wood to a consistent, smooth surface that is free from any major scratches that could have been caused by the heavy grit paper.
In the end, you should be left with a clean piece of unfinished wood. I have to say that the traditional handheld sandpaper is still going to be your very best friend. Remember to wipe down the surface with a clean, damp rag. Run the rag over the entire polyurethane surface to pick up any additional dust that may have been left behind.
Tips: Wear a face mask to avoid inhaling any dust. Sanding the polyurethane will create flakes and dust that can irritate your throat and lungs if you inhale them. To be on the safe side, put on a face mask before you start sanding.
Step2: Applying Primer.
Can you follow the process of painting over clear coat directly without giving it a primer coat first?
Doing this can pose two major problems: First, the paint will not have a surface to grip onto properly, which could cause it to peel off. Secondly, without an oil-based primer, the tannins in the resin of the polyurethane may bleed through, leaving you with a yellow or orange appearance.
These problems can be avoided by applying the correct primer. A thin coat of bonding primer is going to be an essential ingredient to painting over polyurethane. Applying a good quality primer can help to prevent tannins from bleeding through your paint and ruining the overall color. Primer should be applied with thick and even strokes.
Applying a primer to your polyurethane finish is essential. Other types of primers are less compatible with the polyurethane finish, which leaves you with an oil-based primer for the best results. An oil-based primer is the only type of primer that is compatible with your polyurethane finish. After you have applied the primer and it is completely dry, you need to gently sand the surface. Try not to sand it so much that you go right through your primer coating.
Step3: Applying Paint.
If you follow above steps correctly, you should have no problem with water-based paint adhering to the polyurethane surface. The use of water-based paint is a good choice, as it has no harmful odors and it can dry a lot faster than oil-based paint.
However, many recommend that you paint over a polyurethane surface with oil-based paint, as it will provide you with a far superior and more durable finish. While you can paint over your polyurethane surface directly with oil-based paints, if you want to achieve the best results, all the steps recommended for water-based painting should also be adhered to when painting with oil-based paints.
Wait for about an hour and feel if the paint is dry to the touch – if it is dry, you can then proceed with a second coat. If at this stage the primer is still visible, apply a third coat and allow it to dry for around 72 hours before you use the surface. Keep in mind that your paint still needs to cure even though it is technically dry. You should wait a minimum of 72 hours before you begin to decorate and place objects on top of it. If you can wait a little longer than this, it is really ideal.
Conclusion:
Follow these detailed steps and you can ensure that your paint will adhere and last a long, long time. It’s even more beneficial when you do it by yourself as it will save your pockets from the cost of hiring a painting worker.
The steps I have provided above will guide you through the entire process. Even if it’s a polyurethane treated furniture, go ahead and enjoy the painting.
It is true that applying a fresh coat of paint over top of polyurethane can be a real chore. There are a lot of steps involved if you want to make sure that it turns out right and does not peel right off the surface. When you take the time to do the job the right way, your piece will last for years to come without the need for constant touchups.
With some of these helpful tips in mind, you should be well on your way to painting your first piece of furniture.